Search This Blog

Sunday, March 31, 2013

Chocolate Easter Bunny

This year in Honor of Easter and Hannah, for the first time, Hannah got a

CHOCOLATE EASTER BUNNY!


Why I did not think of this before, I have no idea.

Tools and Ingredients

A bunny chocolate mold, I used Wilton brand
Enjoy Life Mega Chunks

Use the amount of chocolate the mold calls for.  The mold I used for Hannah calls for 8 oz.  It made 3 bunnies and 3 baskets.  I melted 4 oz. of the chocolate in my microwave on a preset melt 4 oz. chocolate setting.  I removed the chocolate that did not even look melted.  With a rubber spatula, I stirred the chocolate and it melted perfectly!  I poured the melted chocolate into the mold and tapped gently to remove bubbles.  Refrigerate for 1 hour.  They popped right out!

I had a leftover decorated bag from other lollipop candy I had purchased.  I place 1 bunny and 1 basket into the bag, tied with a bow and VOILA!  a Chocolate Bunny to go in Hannah's Easter Basket!

Happy Easter Hannah!

Cinnamon Snack Cereal

Cinnamon Snack Mix

Ok, it can be a finger breakfast food too!

1/4 cup sugar
1 tsp. ground cinnamon
3 T. Earth Balance Soy Free Natural Buttery Spread

4 cups Corn or Rice or combo cereal such as Chex, or Crispix

Combine the sugar and cinnamon.  Set aside.
Melt Buttery Spread in a large microwaveable bowl for 40 seconds.  Swirl the bowl to help melt the remaining solid bits.  Stir in cereal.  Stir well to evenly coat cereal.  Microwave on high 1 min. Stir.  Microwave 1 more minute.  Sprinkle cinnamon and sugar evenly over cereal.  Mix well.  Microwave on High 1 minute.  Spread out to cool.  Store in an airtight container if you don't eat it all now.

Makes 4 cups.

Sunday, March 24, 2013

Updated Muffins and Rice Flour Mix

This morning I whipped up a new batch of Brown Rice Flour Mix to make Hannah some Chocolate Chip Muffins.  I realized I did not have Chocolate Chip Muffins on the Muffins, with Variations page.  I have added Chocolate Chip Muffins to the Muffins, with Variations page, with a photo.

I encounter a thick batter problem with this morning's batch of muffins.  Maybe it's because I used a fresh fluffy batch of Brown Rice Flour Mix?  Or maybe because I didn't use the spooning method, but the dipping method instead.  As a result, my muffin batter was too thick.  So I added an additional tablespoon or two of rice milk to thin it out a little.

This muffin batter is slightly thicker than a traditional muffin batter.  I used two spoons to spoon the batter into the muffin tins.

Also, the 10-12 muffin recipe makes 12 mini- muffins and about 5 regular muffins.  Cook the mini-muffins about 15-20 min.

I have made these changes on the Muffins, with Variations page.

I also added some notes about quantity and storage on the Rice Flour Mix page.

Sunday, March 17, 2013

Chicken Pot Pie

Chicken Pot Pie


Makes 1 regular pie, in either a pie pan or a 2 qt casserole dish

Prep time: approx. 2 hours

2 crust pie dough, chilled

2 boneless chicken breasts, diced and cooked or 1 cup diced cooked chicken
1/3 cup chopped onion
olive oil
12 oz mixed frozen vegi's such as peas, carrots, corn

1/3 cup potato flour
1 1/2 tsp. dried sage
1 1/2 tsp. salt
1/8 tsp. pepper

1 cup chicken broth
1/3 cup rice milk

Step 1.  2 hours prior to serving time, prepare the pie dough recipe. Divide it into two balls.  Place these in the refrigerator to chill for 1 hour.

Step 2.  While pie crust is chilling, dice the chicken breasts and the onion.   I like to use frozen chicken breasts that are still slightly frozen. The chicken is easy to slice into 1/4 in thin strips and then dice the strips.  Heat a deep saucepan over med-high heat.  Add a touch of olive oil. Wait a minute for oil to heat, then add chicken carefully, it may spatter a bit. Add chopped onion now too. Cook and stir chicken and onion about 3 min. to brown and cook through. (If you are using pre-cooked chicken, just brown the onion.)  Add the frozen vegetables.  Cook until frozen vegetables are heated.  Remove skillet from heat and set aside.

Step 3. Heat the oven to 450 degrees. Remove 1 ball of pie crust dough from refrigerator.  Allow to sit at room temperature for 10 min. to warm slightly.  Lay out one pie of wax paper large enough to cover your pie pan.  Place the pie crust dough ball on this piece of wax paper.  Lay out another piece of wax paper on top of the pie crust dough ball. Use a rolling pin to roll out the ball flat.  Roll it large enough fit your pie pan.  Remove the top sheet of wax paper.  Grease your pie pan.  Carefully flip your pie dough over into your greased pan, dough side down, wax paper side up.  Carefully peel away your wax paper and press and form the pie dough into the pan.  Trim the edges if any pie dough is hanging over the edges.  Poke the pie dough with a fork throughout the bottom of the pan.  Place the pie pan in the oven and bake the crust 10-12 min.  Remove the 2nd pie dough ball from the refrigerator to warm up.

Step 4.  Return the chicken/onion/vegi pan to medium heat.  Sprinkle the potato flour over the mixture.  Add sage, salt and pepper.  Stir this up a bit.  Then add chicken broth and rice milk.  Cook and stir over medium heat until thickened.  Once thickened, set aside.

Step 5.  When the bottom pie crust is done, remove from heat and set aside.  Reduce oven heat to 425 degrees.

Step 6.  Roll out the 2nd pie dough ball in the same manner as you rolled out the first, between 2 pieces of waxed paper.  Pour the chicken/vegi filling into the pre-baked pie crust in the pan.  Flip the 2nd pie crust onto the chicken pie with the dough side down, wax paper on top.  Carefully remove the waxed paper.  Trim any dough hanging over the edges.  Use a sharp knife to cut 3-4 steam holes in the top crust.

Step 7. Carefully place the pie in the oven.  Bake for 25 min. or until top crust is golden.  Remove pie from oven to a rack.  Allow to cool 15 min. prior to cutting and serving.

For individual pot pies, use individual pie pans.

Pie Crust from Scratch

Pie Crust

Makes 2 pie crusts

1/2 cup brown rice flour
1/2 cup white rice flour
1/2 cup tapioca starch
1 cup sweet sorghum flour
1 tsp. xanthan gum
1 tsp. salt
dash sugar (if using for a sweet filling, omit for savory fillings)
1 cup spectrum shortening
6-8 T. ice water

Combine the dry ingredients in a large mixing bowl.  Cut in shortening until crumbly using a pastry cutter or two knifes in a criss-cross fashion.  Add the ice water 1 T. add a time until it stirs into a ball. Turn out onto a lightly floured surface and knead a few times.  Divide the dough into 2 balls, wrap in parchment or wax paper, chill at least one hour or overnight.

Remove from refrigerator and allow to stand for 5 min. to warm slightly.  Roll each ball of dough between two sheets of parchment or wax paper.

Remove the top sheet of wax paper.  Gently flip and place uncovered side of dough onto the center of pie plate so the remaining wax paper is on top. Press the dough down to fit the form of the plate.  Carefully peel away the 2nd piece of wax paper.
 

Use a knife to cut around the outside edges of the pie plate to trip the excess dough.  Prebake or fill as desired.
Repeat the rolling processes for the 2nd ball of dough and use it for 2nd pie, or top crust on the first pie.
To prebake, prick with fork, bake for 10-12 min. at 450 degrees.
To make the fluted edges shown, I push down on the edge of the dough with my index and middle finger of my left hand, my fingers pointing into the middle of the pie, the fingers spread apart slightly.  I use the index finger of my right hand and place it between left fingers.  I pull the dough up and push inward gently with my right index finger while holding the edges under my left fingers down.  This makes one flute.  Reposition your fingers so your left index finger is where your left middle finger was and your middle finger is pressing on unformed dough.  Repeat the lift and push with your right index finger between your left index and middle finger.  This makes the next flute.  Continue in the manner around the edge of the whole pie.

Use a sharp knife to cut steam holes in the top crust, if desired.

Saturday, March 16, 2013

Chowder

Chowder

1 bowl of chowder for my girl!

1 c. rice milk
1 c. diced potatoes
1/4 tsp. dried minced garlic, or 1/2 tsp fresh minced garlic
1 T. dried onion, or 2 T fresh chopped onion
1 T. cornstarch or potato starch
1/2 tsp. salt
1/4 tsp pepper
1/4 c. corn, canned, fresh or frozen (thawed)

Combine rice milk, potatoes, garlic, and onion in a medium saucepan.  Boil down to about 1/2 c. remaining and it is slightly thickened and creamy.  In a small container with a lid, combine cornstarch and 1/2 cup of broth.  Cover with lid and shake until cornstarch is dissolved.  Stir cornstarch mixture into potato cream mixture.  Add salt, pepper and corn.  Cook and stir 1 min. more until creamy.  This might make 1 bowl with leftovers for 1 more, or maybe serves 2!

Serve with Garlic Toast Sticks.

Fruit Smoothie

Fruit Smoothie


It's winter/sprimg, so fruit it a bit scarce.  But with a bag of frozen mixed fruit, I can still make Hannah a nice fruit smoothie.  If you are new to smoothie's let me just say, add what you want and what you have!  There is not a set recipe.  Experiment!  This is fun in spring when the berries are in season and throughout the summer with all the colorful produce in season.  I personally like to add greens and vegi's to my smoothies. This morning Hannah would not have gone for it, so I left it out.

Today, this smoothie contained:

1/4 cup orange juice with calcium concentrate  (I use it to add the Vit.C and Calcium to Hannah's diet and tang to the smoothie)
1 ripe banana
1/2 a left over apple, cored, peel left on- it was reddish yellow apple, possibly Gala.
about 2 cups of mixed frozen fruit (pineapple, mango, peach, strawberries, red grapes)
1 medium carrot, snapped into about 5 pieces
Rice milk
water
some stevia

I use a  Blendtec Blender.  I added all the solids then filled the container with Rice milk to about the 3 cup line and water to the 4 cup line.  I usually add some ice, but I just realized I skipped the ice today.  I sprinkled in maybe a 1/4 tsp. stevia to keep it sweet.  I blended with the pre-set XL Smoothie setting on my Blendtec.  This made 3 large glasses of smoothie and served 3 of us.  Had Papa been home, it would have served 4 comfortably.

Bacon, Yum!

Easy Crispy Bacon (and a Clean Microwave)

This is how I make bacon.  Tools needed:

Bacon
a microwave, with a custom bacon setting
3 cheap thin truly paper- paper plates.  The kind you buy by the hundreds for super cheap that are usually best used for craft projects.
5 paper towels

The set up:


Fold 2 paper towel in 4th's lengthwise.  Place these across from each other at the edges of the turntable in the microwave.  Turn one paper plate upside down and place in center of the turntable.   Place 2 paper plates right side up on top of the upside down place.  Fold another paper towel in 1/2 on way, turn and fold in 1/2 the other way so you have a 4 ply square.  Place this in the center of the paper plates.  

Add Bacon:


Lay another paper towel, full size, over the paper plates.  Add 4-6 pieces of bacon; lay them out individually,  ends hanging over the long folded paper towels at the sides.  Cover the bacon with the last paper towel:

Cover the bacon completely; I folded it back so you could see the bacon between the paper towels.

Set the Microwave Custom Bacon setting following your microwave directions.
In this case of 4 pieces of bacon, approx. 3 min. later:
The bacon is crisp and the paper towels and plates have soaked up all the greasy fat drippings.  Carefully (it's HOT), removed the top paper towel and discard:

I'm not exaggerating when I say this bacon is shatter quality crisp.  Handle with care.  Squeeze too hard- it shatters.  Drop it- it shatters. Pull it too hard from the paper towel where it might be a bit stuck - it shatters.  
Carefully loosen the ends of the bacon; remove the bacon from the microwave and gently place on a plate.

Discard the greasy paper products.  Grab a clean, hot, wet dish rag and wipe the inside of grease steamed microwave clean in seconds.  Remove the turntable and quickly wash with a squirt of dish soap and hot water.  Return to your nicely cleaned microwave.

Devour the bacon.  Oops, I mean serve with Mom's Homemade Hashbrowns  crumble into bacon bits, or do what you will with this beautifully Easy Crispy Bacon!

Mom's Homemade Hashbrowns

Mom's Homemade Hashbrowns

Less expensive than frozen store bought hashbrowns.  Tastes better too!

Makes approx. 8" circle of hashbrowns, serves 1-2

2 smallish potatoes (not bakers)
salt
pepper
onion powder
oil
Ketchup

Good hashbrowns start with rinsed and dried shredded potatoes:
Scrub the potatoes clean.  DO NOT peel the potatoes.  Shred the potatoes with your chosen method into a large colander.  I use a Salad Shooter.  (A hand grater or food processor works well too.)  I place the colander in a bowl approx. the same size.  Fill the colandar/bowl with cold water and swish the shredded potatoes to remove the extra starch from the potatoes.  Raise the colander out of the bowl, discard water and repeat the rinse processes once more.  Drain the potatoes well and dry the bowl.  
On a flat serve, lay out a large hand towel.  Place a large dish towel (lint free) on top of the hand towel.  These towels will dry the potatoes quickly.  Shake the colander well over the sink to get as much water off as possible.  Dump shredded potatoes onto one side of the towel set-up.  Fold the other side of the towel set-up over the potatoes and pat the potatoes dry.  Use the towels to stir up the potatoes to get them nice and dry.  Carefully pick up the towel with the potatoes and funnel the potatoes into the dry bowl.  Add salt, pepper and onion powder to taste.  Mix well.

Great Hashbrowns continue with a preheated pan:
Preheat a large non-stick skillet over medium heat.  Add a bit of oil (to brown the potatoes).  Wait a minute for the oil to get hot.  Add the rinsed, dried, seasoned, shredded potatoes.  Use a spatula to pack, flatten and round up the edges for a clean edge.  Reduce heat slightly to medium-low.  Slowly cook the hashbrowns  10-15 min. until golden brown around the edges.


Beautiful Hashbrowns are flipped with a dinner plate:
Place a dinner plate over the hashbrowns.  Flip the skillet. Hashbrowns will flip out onto the plate.  Replace the skillet, as a bit more oil.  Allow to heat a minute.  Slide the hashbrowns, browned side up now, back into the hot oiled skillet and brown the 2nd side another 8-10 min.  

When golden browned and crispy on the outside- cooked on the inside- slide the hashbrowns out onto a clean dinner plate.  Cut in half with a sharp knife if sharing with another person.  Serve warm with ketchup and Easy Crispy Bacon

A Saturday Breakfast for Hannah

Hannah has been sick for 3 days and still not feeling well.  So when she asked for food this morning, I was willing to deliver. . .

Hannah asked, "Mom, will you make me breakfast?"
"What?" I asked.
"Hashbrowns....and something with meat?" she replied.
"Bacon?" I offered.
"We have bacon?!?" (It usually doesn't last too long in our household.)
A bit later while I was in the process of making the hashbrowns and bacon, Hannah asks, "Can you make me a smoothie too?"
"What kind?"
"Fruit"

These were the results!
 

Mom's Homemade Hashbrowns
Easy Crispy Bacon
Fruit Smoothie


Tuesday, March 12, 2013

Meatloaf and potatoes

Meatloaf and Potatoes

Homestyle comfort food at its best! (minus the eggs, milk and bread crumbs)

Serves 3-4

baking potatoes, any number you like
olive oil
3/4 lb. ground beef
1/2 c. ketchup
1 T. potato starch
1/4 c. water
1/2 carrot, grated
1/2 tsp. dry mustard
1/8 tsp. pepper
1 tsp. dried minced onion


Preheat oven to 400 degrees. Scrub potatoes clean.  Poke skins with a fork to allow steam to escape while baking.  Drizzle potatoes with a touch of olive oil; rub all over potatoes. Place in hot oven, leaving room in the center for the loaf pan of meatloaf.  Combine remaining ingredients in a food processor.  Turn food processor on and allow to run 2-3 min. until well combined.  The ground meat will begin to stick together and roll around in the food processor in a ball.
Using a rubber spatula, turn meat out into a regular sized loaf pan.  Pat meat down into a firm loaf.  Place pan in center of hot oven.  Bake 35 min. or until meat thermometer measures 170 degrees.  Remove meatloaf from oven, allow to rest 10 min. while potatoes complete cooking.  Remove potatoes to a platter with hot pads.  Slice meatloaf.  Serve with ketchup and baked potatoes.

Sunday, March 10, 2013

Cream of Broccoli Soup

Cream of Broccoli Soup

I grew up loving my mother's Cream of Broccoli Soup that was made with milk, cheddar cheese and cream cheese, thicken with wheat flour; none of which Hannah can eat without rashy side effects.

This is the recipe I have altered to use Hannah's allergy safe ingredients.  It tastes as good as the original recipe!

Makes 3-4 servings.  Can be doubled to make 6-8.


3/4 lb fresh broccoli
1 cup allergy safe chicken broth or beef broth
4 T. olive oil
3 T. potato flour
1/4 tsp. onion powder
1 1/2 cups rice milk
1/2 tsp. salt
1/4 tsp. pepper
3/4 c. Daiya shredded cheddar style- completely optional.  The photo above does NOT contain "cheddar"

Cut individual stems of broccoli from main stalk.  With a paring knife, cut and peel from the end of the stalk to the florets the tough outer layer on each individual stem.  As you get to the top center piece, you can usually just cut that thick bunch in half without peeling. Discard hard main stalk. Place peeled broccoli in a large saucepan with broth and bring to boil.  Reduce heat and simmer until broccoli is well cooked.  Remove broccoli from broth with a slotted spoon, place on a cutting board.  Save the broth, pour into a separate measuring cup.  Chop broccoli into small- fine pieces. In the large saucepan, add olive oil, potato flour, and onion powder.  Over medium heat, slowly add rice milk.  Add chopped broccoli.  Add Daiya if using.  Cook until melted.  Stir in salt and pepper to taste.  Serve with Garlic Toast Sticks.

Thursday, March 7, 2013

I know I need pictures!

I know I need pictures of all this yummy food.  It all takes time to post, make and bake, photo graph, upload, edit, and repost.  I will post pictures as I can when I remember to take photos when I make the food.  My first purpose was to get these recipes posted for the friends asking for help in going gluten and other allergy foods free.  At least tonight I managed to add some links to the websites that help make feeding Hannah possible!

Tuna and Crackers

Tuna and Crackers

Yes, this really does taste good!

1 can Genova Tonno solid light tuna in olive oil, strained
a large spoonful of unsweetened apple sauce
a long squeeze of olive oil from a squeeze bottle
a long squirt of lemon juice from the lemon in the fridge
Oregon Cracker Company Garden Vegetable Crackers

Mix the tuna, applesauce, olive oil, and lemon juice very well.  The applesauce acts like the mayo in traditional tuna to hold it all together.  Spoon onto crackers and enjoy!

Chicken Nuggets or Strips

Chicken Nuggets or Strips

Better than Shake-N-Bake


Serves 5-6

2 lbs. boneless chicken, diced into nuggets or sliced into strips
1 T. sorghum flour
1 T. tapioca starch
1 T. dried oregano
1 T. dried thyme
1/2 tsp. ground pepper
1/2 tsp. salt
1/2 cup oil

Heat oven to 400.

Combine ingredients, except for chicken and oil, in blender or food processor and process until well blended.  Pour into a bread bag or ziploc bag.  Pour the oil into another bag.  Put chicken in the bag of oil, twist it closed or zip it close and shake it up, roll it around, coat the chicken in the oil.  Use tongs to remove chicken from oil and drop into breading mixture bag.  If strips are large enough, you may need to move them into bread 1 or 2 at a time.  Close the bag by twisting or zipping and give it a good shake!  Using cleaned, dry tongs, remove the breaded chicken to a large parchment lined baking sheet.  Bake 15 min. for nuggets, 25 min. for strips.  Serve warm with honey, allergy safe BBQ sauce, honey mustard, or even plain ketchup!

Cinnamon CRUNCH Popcorn- Hannah style

Cinnamon CRUNCH Popcorn - Hannah Style

She can make this one all on her own.  This version is a bit more "carmalized" like Cracker Jacks or Fiddle Faddle, only Cinnamon!

Makes 4 servings. 

2 tsp. cinnamon
1 T. sugar
1/4 tsp salt
1/4 c. popcorn kernels
1/4 c. oil - we use olive for this
1/4 c. sugar

If using an electric stove, pre-heat the burner to medium high heat.  This is not necessary if using a gas burner.

Add EVERYTHING to the popper.  Fasten the lid securely.  Place on burner heated to medium to medium high heat.  Slowly turn the crank on handle to stir the popcorn.  Popping should start in about 2-3 min.  Continue stirring until popping almost stops.

Dumping the contents into a large popcorn bowl or onto a large tray to cool.  Break apart before serving.    Stores well in airtight containers.

Cinnamon Crunch Popcorn, by Whirley Pop

Cinnamon Crunch Popcorn, by Whirley Pop

This takes 2 people once the popping is finished.

Makes 6 servings. . .but it's barely enough for our family of 5.


2 tsp. cinnamon
1 T. sugar
1/4 tsp salt

1/4 c. popcorn kernels
1/4 c. oil - we use olive for this
1/4 c. sugar

In a 1/2 cup measuring cup, mix the cinnamon, 1 T. sugar and salt.  Set close to stove.

If using an electric stove, pre-heat the burner to medium high heat.  This is not necessary if using a gas burner.

Add popcorn, oil and 1/4 c. sugar to the popper.  Fasten the lid securely.  Place on burner heated to medium high heat.  Slowly turn the crank on handle to stir the popcorn.  Popping should start in about 2-3 min.  Continue stirring until popping almost stops.

Remove quickly from heat, open lid and pour in cinnamon/sugar mixture over hot popcorn.  I found this mixes best if you have a 2nd person continue stirring with the crank while I sprinkle the cinnamon/sugar mixture over the moving popcorn.  It's hot, so use hot mitts to protect yourself from the steam.  We then close the lid and give it a few more quick stirs with the crank before dumping the contents into a large popcorn bowl or onto a large tray to cool.    Stores well in airtight containers.

Our Favorite "appliance"

Original Whirley Pop

Original Whirley Pop

This is by far probably Hannah's favorite "appliance" to help her make one her most favorite snacks- Cinnamon CRUNCH Popcorn- Hannah Style!  You see, Hannah cannot have microwave popcorn.  It's typically got things in it she cannot have.  Air-popped popcorn is just not good enough for a girl who cannot have 90% of the goodies out there.  When Hannah was just a toddler (about 10 years ago), her Aunt Alicia gave our family a Whirley Pop popcorn popper for Christmas.  This was the best gift EVER! With the Whirley Pop, we can choose the type of oil to use, from plain canola, to tasty olive oil, and tropical coconut.  No butter required to make deliciously "plain" popcorn.  Add a bit of sugar and we get our own homemade Kettle Corn.  Add a bit of cinnamon and sugar, we get Cinnamon Crunch Popcorn.  Add some Italian seasonings, we get "Pizza" popcorn.  It's all popcorn Hannah can have.  It's fast.  It's easy. It's delicious. It goes in lunch boxes, on picnic's, in car rides, to parties, and makes for great homemade food gifts.

Wednesday, March 6, 2013

Homemade Chili Mac

Homemade Chili Mac 


Serves 6-8

1 onion, chopped
1 lb. ground beef or turkey
2 cloves minced garlic, or 1/4 tsp dried mince garlic
1 cup uncooked Andean Dream Gluten Free Macaroni
1 15.25 oz. can kidney beans
1 15 oz. can tomato sauce
1 14.5 oz can diced tomatoes (or another can tomato sauce if you don't like chunks of tomato in your food)
1 15.25 oz. can corn
1 T. chili powder
1 tsp. cumin powder
shredded cheddar style Daiya "cheese"

In a large skillet, brown ground beef, onions, and garlic  (add dried garlic with tomato sauce) over med-high heat.  Meanwhile, cook macaroni according package directions. Drain pasta.  Add to skillet of ground beef along with the remaining ingredients-except Daiya.  Simmer over med. heat until heated through.  Serve warm with the Daiya cheese to sprinkle on the top.

This is just as good as leftovers the next day or warmed and put in a thermos for a school lunch.

Our Favorite Website

One of our favorite websites for Hannah is Kids with Food Allergies.  Kids With Food Allergies Foundation

I subscribe to their membership specifically to access their large database of searchable recipes.   I can mark the foods Hannah is allergic to and then search for recipes she can have.  You can also simply browse.  Every time I let my subscription expire, I find I need to search the recipe database again and renew my subscription.

Some of the recipes I've posted on this website may have origins from KFA.  Rarely do I ever make a recipe the way it's written though.  What's posted here would be my morphed version of what I may have originally found in the recipes of KFA.  I will also mention that obviously people other than kids can use these recipes!

There is also a lot of information and support to found at this website too.  Most of this is specific to kids and parents of kids with allergies.


Tuesday, March 5, 2013

Garlic Toast Sticks

Garlic Toast Sticks

Allergy safe bread of your choice; Hannah uses Ener-G Brown Rice Yeast Free Loaf or Food For Life         Multi-Seed Rice Bread
olive oil
garlic powder

Drizzle slices of bread with olive oil and sprinkle with garlic powder.  Cut into 1 inch sticks.  Toast on the broil tray of a toaster oven or on a rack with your regular oven on broil.  Watch it closely if using the broiler so as not to burn.  Toaster oven has the advantage of a build in timer/on/off function.  Serve with soup, chowder, Cream of Broccoli Soup, spaghetti or Alfredo Noodles or Mac-n-Cheese.

Alfredo Noodles

Alfredo Noodles with Variations


Single Serving

1/2 c. dry gluten free Alfredo noodles, or other long noodles
1/4 tsp. salt
1 T. chopped onion
1/4 tsp. chopped garlic
1 T. Earth Balance Natural Buttery Spread Soy Free
1 tsp. Better Than Rice Milk rice milk powder
1/2 c. rice milk
1 T. cornstarch
1/2 tsp. salt
1/8 tsp. pepper

Cook pasta in salted boiling water according to package directions.  Saute onion and garlic in buttery spread until soft.  Drain pasta, add remaining ingredients until thickened and creamy.

Chicken Alfredo- add some cooked chopped chicken

Shrimp Alfredo- add some small cooked shrimp

One Pot Alfredo Dinner- add one chicken or shrimp and your favorite mixed vegetables!

Mac N Cheese, Hannah Style

Mac N Cheese

Hannah Style

Single Serving

1/2 c. dry Andean Dream Quinoa Macaroni
1/4 tsp. salt
1 tsp. Better Than Rice Milk rice milk powder
1/2 tsp. cornstarch
dash salt
dash pepper
dash onion powder
dash garlic
1 T. rice milk
1 T. Earth Balance Natural Buttery Spread Soy Free
1/4 c. Daiya shredded cheddar style , optional

In a large saucepan, bring 3-4 cups of water a boil.  Add pasta and salt.  Boil 6-8 min. or until pasta is tender.  Drain.  Return pasta to pan and add remaining ingredients.  Cook and stir over low heat until thickened and melted.  If you leave out the cheddar style cheese, it more like and alfredo white sauce pasta.

Makes a bunch!

1 - 8 oz. box Andean Dream Quinoa Pasta
1 tsp. salt
1 T. Better than Rice Milk rice powder
1/2 T. cornstarch
1/4 tsp. salt
less than 1/8 tsp pepper
6 shakes of onion powder
few shakes of garlic powder
1/2 c. rice milk
1/4 c. Earth Balance Natural Buttery Spread, Soy Free
1 cup Daiya shredded cheddar style

Monday, March 4, 2013

Twirls, Grandma Bray Style

Twirls

by Grandma Bray, altered for Hannah

1 lb. ground beef
1/4 c. chopped onions
1/2 c. finely chopped celery
2 T. finely chopped green pepper
1 T. Potato Starch
1/2 c. water 
1 tsp. salt
1/4 tsp pepper
1 batch of Biscuits dough

Heat oven to 375 degrees.

Brown the ground beef with the onions, celery and green pepper over medium high heat in a large saucepan.
Sprinkle with potato starch, add water, salt and pepper.  Reduce heat to low; cook and stir until thickened and creamy.

Make up biscuit dough, if not already prepared.  Roll/Pat dough into a rectangle on a piece of plastic wrap or pastry cloth until 9 x 13 ish, 1/2 inch thick.  Spread the ground beef  mixture over the surface of the biscuit dough, leaving a 1/2 inch margin on one long side.

 Using the plastic wrap to help hold things together, roll from opposite side of the margin into a "jelly roll".  The margin will help seal the edge with the roll. Wrap the jelly roll in plastic wrap and place in the freezer for 10-15 min. help firm it up.

Using a very sharp knife, or better yet, a 12" piece of thread, slice the rolls into 1" slices.  (If using the thread, you carefully slide the middle of the thread under the roll to the 1" depth for the slice. Bring both end up and wrap the thread up and around the roll across to the opposite sides, pulling tight and it "pinch" off the slice.) Place slices down flat (see the "twirl") on a baking sheet.  Bake 15-20 min.
Serve warm with brown gravy (coming soon), or creamy sauce (also coming soon).  Grandma Bray served her's with mushroom gravy: 1 can cream of mushroom soup mixed with 2/3 can of milk.

Homemade Chicken Broth

Homemade Chicken Broth

I make this when I have time to save money and build up food storage that is Hannah safe food.  I purchase whole chickens 2 at a time from the store.  To make more for canning, I will get two pots going with 4 total chickens.  You can use fresh butchered chickens from the backyard too.  I've done that before, though that definitely takes more time!

2 chicken necks, backs, & wings
2-3 large carrots
2-3 stalks celery and leaves  (I like to use the "heart" of the celery still where the stalks are smaller and more leafy after I've used the larger crunchy stalks for other things)
1 medium onion
1 T. parsely or 1 sprig fresh parsley
1-2 tsp salt, depending on how much water you add
1/2 tsp. sage
1/4 tsp. pepper
2 bay leaves
8 cups water

Put the chicken pieces in a very large (4 qt ?) pot.  Don't bother to peel the carrots or onion.  Chop carrots into chunks.  Cut the base off the celery and throw leafy stalks.  Snap the bigger stalks into pieces if using the outer stalks.  Quarter the onion.  Toss all this into the pot with the chicken.  Add parsley, salt, sage, pepper and bay leaves.  Fill the pot with water.  Bring to a boil.  Reduce heat to low, cover and simmer for minimum of 2 hours.  Using tongs and a slotted spoon, remove the chicken and vegetable pieces, discard.  Set a strainer over a large bowl (8 cups?).  You can do 1 of 3 things: line the strainer with cheesecloth or an old clean thread bare dish towel, or use a fine mesh strainer.  Carefully poor the broth from the pot through the strainer.  Allow to cool down a bit.  I then put my chicken broth in the fridge overnight.  The fat will rise to the top and solidify.  I use a pancake spatula to skim the solidified chicken fat from the broth and discard it.  The broth turns to a jelly like substance at this temperature.  You can store the broth in the fridge and use it within 3 days.  Or you can pour the broth in 2 cup measures into labeled freezer ziplock bags.  Lay flat when you put them in the freezer.  Once frozen, they stack nicely.  Use within 6 months.  Or, you can sterilize pint jars and lids and rings.  Heat the broth to a boil and fill the jars, leaving 1" space at the top.  Wipe the rims, screw down the lids with bands and process in a pressure canner.  I use a dial gauge, less than 2,000 feet altitude 11 lbs pressure 20 min. for the pints.  If you are under different circumstances you can check out the instructions at http://www.gopresto.com/recipes/canning/soups.php

Salmon Patties, version 2


Picture from version 2 - 5/17/13


3/4/13
Tonight for dinner, I made salmon patties with some leftover fresh broiled salmon.  Here are the approximations of what I put into them.  I sort of made it up as I went along, loosely following a traditional salmon patty recipe, substituting what I needed to with what I thought would perform a similar function.  Hannah only gave me one bite.  I found it was a bit chewy compared to a traditional salmon patty, but Hannah loved them.  I used potato starch in the patties she ate.  I've changed it to potato flour in the recipe in hopes it won't be as chewy. I'm also thinking next time I will just use straight up cornmeal rather than the cornbread mix. I will add feedback when I make it again to see if it helped.  It also seemed a bit on the wet side when making it.  So I reduced the water from 2 T to 1 T.  Add additional water if needed.  This recipe made her 6 patties about 2" diameter x 1/2" thick.

5/27/13 update:  Tonight I made the patties, but I used a 5 oz. can of salmon instead of fresh, and the green pepper was supposed to say green onion so I changed that too.  Following the amounts below, even with the 5 oz. canned salmon I found it too dry with just the 1 T. of water.  I ended up using 3 T. of water.  The recipe still made the same number of patties.  This time I have a picture!


Salmon Patties

Makes 6 patties

1 T. finely chopped onion or chopped green onion including the green tops
1 cup shredded salmon
1/4 c. chopped gluten free oats to look more like quick oats
1/4 tsp. parsley
2 shakes of garlic powder
1/2 tsp. dried dill weed
dash of paprika
1/4 tsp salt
a few grinds of black pepper from a peppermill
1 T. potato flour
2 T. Bob's Red Mill Gluten Free Cornbread Mix
1 T. to 3 T. warm water, added 1 T. at a time
3 T. oil

Saute the onion in about 1 T of the oil over medium to medium high heat until golden.  In a small bowl, combine all the ingredients.  Mix well.  I used a 2 T (I think) sized scoop to scoop out the salmon mixture and formed into balls.  I flatten the balls into 1/2 inch thick patties on a plastic cutting board.  The mixture did stick some to my hands, but not much to the cutting board.  Heat pan to Med-High.  Add oil and heat.  Using a pancake spatula, scoop up the patties and place in the hot oil.  Fry until golden brown, flip and fry 2nd side until golden brown.  It only takes 2-3 min. on each side.

I served the patties with Good Old Rice Pilaf.

Good Old Rice Pilaf

Good Old Rice Pilaf


I call this Good Old Rice Pilaf because I do not buy the chicken broth in the main isle of the grocery store.  That chicken broth contains ingredients Hannah is allergic too; soy, yeast, gluten.  For the longest time, I made Homemade Chicken Broth and bottled into pint jars.  Then I went back to work full-time.  To save time (but not money) I purchase Pacific Foods Organic Free Range Chicken Broth.  This is where I get the title of the recipe, because I use simply good old fashion chicken broth that is not altered with soy, yeast and gluten to flavor it.

Makes 2 cups rice

2 T. oil
2 T. finely chopped onion or 1 T. chopped dried onion
1 cup long grain white rice
2 cups Homemade Chicken Broth or other organic allergy safe chicken Broth

Heat 2 quart saucepan over med-high heat.  Add oil; heat.  Add fresh onion, if using, and rice.  "Fry", stirring frequently until rice turns a nice golden color.  Add broth and dried onion, if using.  Bring to a boil, it might not take long.  Reduce heat to low, cover and simmer 15 min.  Resist the urge to peek frequently.  Check after 15 min.  When rice is done, you will see "holes" in the surface of the rice, or at least I do with my saucepan.  Fluff with a fork and serve warm.

Sunday, March 3, 2013

Cinnamon French Muffins

Cinnamon French Muffins


Makes 12 muffins, 20 mini muffins
Topping:, set aside
1/4 cup sugar
1/2 tsp. cinnamon

Egg subtitute, set aside
2 T. warm water
1 1/2 tsp. Ener-G egg replacer

1 1/2 cup gluten free flour
1/2 cup sugar
1 1/2 tsp. baking powder
1/4 tsp. nutmeg
1/8 tsp. salt
1/2 cup rice milk
1/3 cup Spectrum shortening or Earth Balance Natural Buttery Spread Soy Free, melted

3 T. Earth Balance Natural Buttery Spread Soy Free, melted

Heat oven to 350 degrees. 
Combine 1/4 c. sugar and cinnamon, set aside.
In a small bowl, Combine warm water and egg replacer, wisk until dissolved, set aside.
In a large bowl, combing dry ingredients: flour, sugar, baking powder, nutmeg, and salt.
Add rice milk and melted 1/3 cup shortening or buttery spread with egg replacer.  Add wet ingredients to dry flour mixture.  Stir just until moistened.  Fill lightly greased muffin cups or liners 3/4 full.  Bake 20-25 min. until golden brown.  Immediately dip tops into 3 T. melted buttery spread, then into cinnamon sugar mixture. Serve warm.

Muffins, with Variations

Muffins    updated 3/24/13

Makes 10-12 muffins

1 3/4 cups gluten free flour or Rice Flour Mix
1/3 cup sugar
2 tsp. baking powder
1/4 tsp. salt
2 T. warm water
1 1/2 tsp. Ener-G egg replacer
3/4-1 cup rice milk
1/4 cup oil

Makes 6 muffins

1/3 cup plus 1 T. gluten free flour
2 1/2 T. sugar
1 tsp. baking powder
1/8 tsp. salt
1 T. warm water
3/4 tsp. Ener-G egg replacer
1/3-1/2 cup rice milk
2 T. oil

Heat oven to 400 degrees.  In a large mixing bowl, combine dry ingredients- except egg replacer.  In a small bowl, combine warm water and egg replacer, wisk until egg replacer is dissolved and mixture is fluffy.  Add rice milk and oil.  Add wet ingredients to dry ingredients and stir until moistened. You may need to add a bit more liquid.  The batter will be slightly thicker than traditional batters.  Spoon batter into lightly greased muffin tins until 3/4 full.  Bake in a 400 degree oven about 20 min. or till golden brown.

Note: The 10-12 muffins will make 12 mini muffins and about 5 regular muffins.  The 6 muffins will make 12 mini muffins.

Variations:  (6 muffin amount in parenthesis)

Chocolate Chip: Add 1/4 cup (2-3 T) Enjoy Life Semi-Sweet Mini Chocolate Chips, and 1/4 tsp (1/8 tsp) vanilla.

Banana: Reduce milk to 1/2 cup (2 1/2 T).  Add 3/4 cup (1/3 cup) mashed banana to milk.  Do not use paper liners.

Blueberry: Fold in  3/4 cup (1/3 cup) fresh or frozen blueberries, and if desired, 1 tsp. (1/2 tsp) finely shredded lemon peel.

Pumpkin: Add 1 tsp. (1/2 tsp) cinnamon, 1/2 tsp (1/4 tsp.) nutmeg, and 1/8 tsp. (dash x 2) ground cloves to flour mixture.  Add 1/2 cup (1/4 cup) pumpkin puree to milk.  Do not use paper liners.

Apple Cinnamon: Add 1 1/2 tsp. (3/4 tsp.) cinnamon and 1/2 cup (1/4 cup) shredded apple to flour mixture.

Oatmeal Cinnamon: Reduce flour to 1 1/3 cups (2/3 cup) and add 3/4 cup (1/3 cup) gluten free rolled oats, chopped just a little to make them smaller and 1 1/2 (3/4 tsp.) cinnamon.

Cornbread

Cornbread

8x8 square pan or 9" round pan greased with Spectrum shortening

2 T. warm water
1 1/2 tsp. Ener-G egg replacer,  or 1 egg
1 cup rice milk
1/4 cup oil or melted Earth Balance Natural Butter Spread Soy Free
1 1/4 cup yellow, white or blue cornmeal
1 cup gluten free flour or Rice Flour Mix
1/2 cup sugar
1 T. baking powder
1/2 tsp. salt

Heat oven to 400 degrees.  Beat water and egg replacer with a wisk in a small bowl.  Add rice milk and oil or melted "butter".  In a large bowl, combine dry ingredients.  Add wet ingredients and combine until just moistened.  Pour batter into greased pan.  Bake 20-25 min. or until golden brown and toothpick inserted in center comes out clean.

Corn Muffins

Grease bottoms only or line with baking cups.  Bill about 3/4 full.  Bake for 15-20 min.

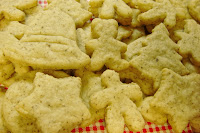
Shaped Sugar Cookies with Frosting or Glaze

Shaped Sugar Cookies

 4-6 dozen depending on size and shape of cookies.
This recipe uses Flax Meal in warm water to substitute as a sticky egg, creating the speckles in the dough.

Christmas Cookies with Frosting 2013
2 T flax meal in 1/3 cup warm water
1 1/4 cup sugar
1 cup Spectrum Shortening
1 T. vanilla
1 cup brown rice flour
1 cup white rice flour
2/3 cup arrowroot starch
1/3 cup tapioca starch
1/2 cup powdered sugar
 3/4 tsp. baking powder
                                                        1/2 tsp. baking soda
                                                        1/2 tsp. salt

Heat oven to 375 degrees.

Mix flax meal in warm water, set aside.

Cream sugar and shortening in large mixing bowl until well blended.  Add flax meal and vanilla.  Beat well.

Combine dry ingredients.  Gradually add to creamed mixture at low speed until well blended.

Refrigerate 1 hour.  Lightly flour surface with rice flour (I like to use a pastry cloth to prevent sticking to the counter).  Place a ball of cookie dough down and roll or pat out to about 1/4 inch thick.  Cut out with desired shaped cookie cutters.  Place on baking sheet and bake 5-9 min. depending on size and thickness of the cookie.  Cool 2 min and remove from sheet to rack.
Unfrosted baked cookies

Frosting

1/2 cup Spectrum Shortening
1/2 cup Earth Balance soy free Natural Buttery Spread
4-5 cups powdered sugar
1/2 tsp vanilla
1-2 T. rice milk

Cream shortening and "butter".  On low speed, add 1 cup powdered sugar until combined.  Add vanilla.  Add another cup powdered sugar until combined.  Add 1 T. rice milk.  Continue to alternate sugar and milk until desired consistency.  Less sugar-3 cups makes thinner frosting for writing.  4 cups makes medium for piping decor.  5 cups makes thicker frosting, spreading.

Glaze

This glaze dries to a shiny firm finish. 

However, after 2-3 days it will start to show it's spots when used on the above cookie recipe.  (For some reason not on regular wheat, milk, egg containing cookies).  This is the best way to describe it.  You will have to make these recipes and let them sit for 2-3 days to see it.

1 cup powdered sugar
1 T. light corn syrup
2 T. water
10 drops food coloring

In a small bowl, mix all but food coloring together.  Stir in food coloring if desired.  Stir the glaze each time you use it.  May need to keep it covered as well to avoid hardening.  Spread THINLY on cookies.  Can be used as a base for decorating with above frosting.

Our Favorite Products- Links added

Some of our favorite products we always keep in stock:

Amy's Gluten Free Dairy Free Burritos
Andean Dream Quinoa Pasta-  spaghetti, macaroni, shells, etc.
Andean Dream cookies
Better Than Milk Rice Milk Powder
Bob's Red Mill Gluten Free flours and mixes
Classico Traditional Sweet Basil Pasta Sauce or
Classico Tomato Basil Pasta Sauce
Coconut Aminos - use in place of soy sauce
Daiya, deliciously dairy free cheddar style or mozzarella style "cheeses"
Earth Balance Soy Free Natural Buttery Spread
Earth Balance Mindful Mayo made with Olive Oil
Ener-G Brown Rice Yeast Free Loaf
Ener-G egg replacer
Enjoy Life cookies, cookies, chocolate, and cereal
Follow Your Heart Vegenaise, Soy-Free
Food For Life Multi-Seed Rice Bread
Garlic Jim's Vegan Pizza We get our's at Lingonberries Market.  It is made with daiya cheese.
Hodgson's Mill Gluten Free mixes, cookies and pancakes
Ian's Gluten Free Fish Sticks
Ian's Gluten Free Chicken Bites
Kinnikinnick Foods K-Toos Chocolate Sandwich Creme cookies
Kraft Zesty Italian Salad Dressing
Namaste Foods mixes
Nature's Path Homestyle Gluten Free Waffles
So Delicious Dairy Free Frozen Dessert (aka Ice Cream)
So Delicious Yogurt
Spectrum Shortening
SunButter, crunchy and creamy

Fast and Easy Pie Crust

Pie Crust


Makes one 9" pie crust

2 cups Rice Flour Mix
1/2 cup Spectrum Shortening
6-8 T. cold water

Measure Rice Flour into mixing bowl.  Cut shortening into flour with a pastry cutter until crumbly.  Slowly stir in cold water 1 T at time.  Mix should just hold together.  Add a bit more water if its too dry.

Turn out onto a Rice Flour Mix dusted surface. (A pastry cloth or plastic wrap is very helpful with this step).  Using a rolling pin covered with a rolling pin cover and dusted with more Rice Flour Mix, roll (or pat with floured hands) dough out to desired size.  Transfer to pie plate. Shape edges as desired.  Pre-bake if needed for the pie recipe at 425 degrees for 15-18 min. or until crust has started to brown.

(If you need more detailed instructions and pictures, see Pie Crust from Scratch)

Biscuits

Biscuits

Makes about 12 biscuits, depending on size.

2 1/2 cups Rice Flour Mix
1 tsp. sugar
1 T. baking powder
1 tsp. salt
1/2 cup Spectrum Shortening or oil
3/4 cup water or rice milk

3-4 Biscuits

3/4 cup Rice Flour Mix or Bob's Red Mill Biscuit and Baking Mix
1/2 tsp. sugar - if not using BRM B&B mix
1 tsp. baking powder, if not using BRM B&B mix
1/3 tsp. salt, if not using BRM B&B mix
2 T. Earth Balance Natural Buttery Spread Soy Free  or Spectrum Shortening
3 T. water or rice milk

Preheat oven to 450 degrees.  Mix the dry ingredients together.  Cut in the shortening, if using shortening, with a pastry cutter or two knifes used in a criss-cross fashion until crumbly.  Otherwise, mix the oil with the water or rice milk.  Add milk to the flour mixture. Stir. It should just be wet enough to hold together.  Add more fluid 1 T. at time if its too dry.  Turn out onto a Rice Flour Mix dusted surface.  Knead the dough 10 times.  Pat or roll to 1/2 inch thickness.  Cut into circles.  Place on an ungreased baking sheet.  Bake 10-12 min. or until golden brown.


Blueberry Corn Pancakes

Blueberry Corn Pancakes

Full Recipe  makes 10 Pancakes

2 T flaxmeal
1/4 cup warm water
2 cups yellow cornmeal
2 tsp. baking powder
1/2 tsp. salt
2 cups rice milk
2 T. pure maple syrup
2 T oil
1 cup fresh or thawed blueberries

(you can use an egg in place of the flaxmeal)

1/2 Recipe makes 5 pancakes

1 T. flaxmeal
2 T. warm water
1 cup yellow cornmeal
1 tsp. baking powder
1/4 tsp. salt
1 cup rice milk
1 T. pure maple syrup
1 T. oil
1/2 cup blueberries

Single Serving

1/2 T. flaxmeal
1 T. warm water
1/2 cup yellow cornmeal
1/2 tsp. baking powder
1/8 tsp salt
1/2 cup rice milk
1/2 T. pure maple syrup
1/2 T oil
1/4 cup blueberries

Mix together flaxmeal and warm water in a small bowl.  Set aside.

Mix together dry ingredients.  In separate bowl, mix together wet ingredients, including the flaxmeal mixture.

Mix wet into dry ingredients just until combined.

Cook on griddle heated to medium heat and oiled. Use a 1/3 cup measure to pour batter onto skillet.  Sprinkle with blueberries.  Cook 2-3 min. on the first side, flip and cook an additional 1-2 min.  These pancakes will not bubble as much as homestyle pancakes.  A firm bottom is the indicator for flip timing.  

 Serve warm with pure maple syrup.


Homestyle Pancakes

Home-style Pancakes

Full Recipe 12-14 pancakes


2 cups Rice Flour Mix
4 tsp. baking powder
1/2 tsp. salt
2 T. sugar
2 cups water, rice milk or milk
3 T oil
1/4 tsp. vanilla

(you can use 1 egg, reduce oil to 1 T. oil and baking powder to 2 tsp.)

1/2 recipe  6-7 pancakes

1 cup Rice Flour Mix
2 tsp. baking powder
1/4 tsp. salt
1 T sugar
1 cup water, rice milk, or milk
1 1/2 T. oil
1/8 tsp vanilla

Single Serving

1/2 cup Rice Flour Mix
1 tsp. baking powder
1/8 tsp salt
1/2 T sugar
1/2 cup water, rice milk or milk
1/2 T plus 1 1/2 tsp. oil
dash of vanilla

Mix the dry ingredients.  Beat in remaining wet ingredients.  Heat the griddle to 325 degrees or a bit over Medium heat.  Make sure it is hot.  Griddle may need a little greasy depending on the quality of the and type of griddle.

Pour batter in less than 1/4 cup amounts.  Cook 2-3 min. or until bubbly on surface and edges are slightly dry.  Turn pancake over; cook 2-3 min. more.

Add chopped bananas, shredded apples & cinnamon, or blueberries.

Rice Flour Mix

Rice Flour Mix     

Makes 4 cups

This is a Rice Flour mix you can substitute equal amounts for wheat flour in quick breads, pancakes, biscuits, crackers and drop cookies.  Some recipes may require additional xanthan gum be added.

1 cup brown rice flour
1 1/4 cup white rice flour
1/4 cup potato starch
2/3 cup tapioca starch
3/4 cup sweet sorghum flour or sweet rice flour
1/3 cup arrowroot starch
2 tsp xanthan gum

Sift together once, Sift together twice.  Sift together a third time into an air tight container.  Stir it up before each use and measure using the spooning method.   (This means you use a spoon to spoon the mix into your measure cup vs dipping the measuring cup into the mix.)

Updated 3/24/13
Storage: I find when I am out of the mix, I can make up this batch and it makes enough for muffins or cookies and the rest will fit into a quart jar for another 1 or 2 recipes.  I store all my flours and starches in quart jars with lids and rings to keep the bugs out.  I cut the store packaging title out and tape it onto the front of the jar and then in sharpie marker write the contents of the jar on the lid.  I store the jars on the bottom shelf of the twirly in my cupboard.  I can look down and see the jar I need from the top.